If you have a sprinkler system, you know how nice it is to not have to worry about your lawn getting the right amount of water or being watered on the days it needs to be. Although the system eliminates a lot of work on your part, there are still times that you will need to fix different components of your sprinkler system. Many of the problems that are encountered with sprinkler systems have to do with the sprinkler heads themselves. Since I usually use Rain Bird sprinkler heads when I am installing a system, this will be the focus of this post.
When a system is installed by a professional, all of the components should work correctly. The heads will shoot where they need to, and the area that needs to be watered will be covered by them. Even when you design your own system and get it set up, it will get the job done. Sometimes, however, you may not be familiar with the way that everything works on your system. Other times, something may happen that will result in the damage of your sprinkler heads (one of the most common being chopped up by the lawn mower). You will find yourself in need of a new head.
When you have determined which product to buy, you can’t just install it and be done. You will need to turn on the system and observe the new head to make sure that it is working properly, covering the area that it needs to cover, and not overshooting its mark. The way that you adjust your sprinkler head will depend on the type of sprinkler that you have. The two main types are the rotor sprinkler and the pop-up sprinkler; we will focus on the rotor type.

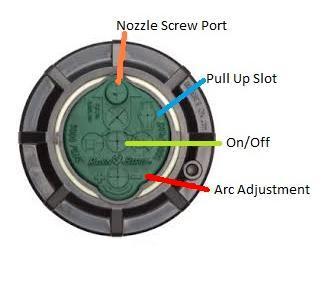
Rotor sprinklers are usually used to cover a larger area. They shoot a fairly straight stream of water out of its nozzle. As it rotates, this stream will water the area that it has been set to cover. If your head is either over rotating or under rotating, you will need to adjust the diameter of the head. Most units will have a dial on top that can change the angle at which the water will shoot. There is a specific tool that needs to be used to do this which will prevent damage to the head. There is a slot where you can insert the tool. Turning it to the right will increase the angle and turning it to the left will decrease it.
If you want to increase or decrease the distance the head will shoot, you will need to remove the nozzle and put a new one in. To know the distance that each nozzle will shoot, you will need to look at a user’s manual. If you don’t have one available, they can be found online. Above the nozzle there is a screw that needs to be loosened. After you have done this, insert the tool into the pull up spot and lift the head. Pop out the old nozzle, put the new one in and put the head back into the ground. Tighten the nozzle screw and run the system to make sure it is working properly. Rain Bird makes your work easy!

